In industrial environments, paint isn’t just decorative; it’s functional protection. Coatings shield surfaces from corrosion, chemicals, moisture, abrasion, and constant wear. But even the most advanced coating system will fail if the surface beneath it isn’t properly prepared.
That’s why preparing walls for painting is the most critical step in any industrial painting project. Skipping or rushing prep work may save time upfront, but it almost always leads to peeling, blistering, corrosion, premature repainting, and costly downtime later.
Whether you manage a manufacturing plant, warehouse, processing facility, or utility building, understanding the role of surface preparation will help you make better decisions, protect your assets, and extend the life of your coatings.
Why Wall Preparation Matters More in Industrial Facilities
Industrial walls face far harsher conditions than typical commercial interiors. These surfaces are exposed to:
- Temperature swings
- Moisture and condensation
- Chemicals and oils
- Abrasion from equipment and traffic
- Dust, grease, and airborne contaminants
- Structural movement and vibration
Paint is only as strong as the surface it bonds to. If walls are dirty, slick, chalky, damp, or compromised, coatings cannot adhere properly, no matter how good the product is.
Proper wall preparation creates a clean, stable, and receptive surface, allowing coatings to bond correctly and perform as intended for years instead of months.
What Proper Wall Preparation Really Means in Industrial Facilities
Preparing walls for painting is not a single task; it’s a coordinated system of steps that ensure coatings bond correctly and perform as intended in demanding industrial environments. Each phase of preparation addresses a specific risk, and skipping even one can compromise the entire coating system.
The table below shows how each preparation step directly prevents common – and costly – paint failures in industrial facilities.
| Preparation Step | Why It Matters | What Happens If It’s Skipped |
| Assess wall condition and exposure risks | Identifies moisture, chemical exposure, temperature swings, and existing coating issues before work begins. | Coating systems are mismatched to the environment, leading to early failure. |
| Remove dirt, grease, oils, and residues | Creates a clean surface so coatings can bond directly to the substrate. | Paint peels or delaminates due to contaminants blocking adhesion. |
| Address moisture and condensation issues | Prevents trapped moisture from pushing coatings off the surface over time. | Blistering, bubbling, and premature coating breakdown. |
| Repair cracks, spalls, and surface damage | Creates a uniform, stable surface that supports even coating thickness. | Cracks telegraph through the finish and allow moisture intrusion. |
| Remove loose or failing coatings | Eliminates unstable layers that compromise new coatings. | New paint fails along with the old coating underneath. |
| Create surface texture for mechanical adhesion | Gives coatings a physical profile to grip, especially on concrete and masonry. | Smooth surfaces cause poor adhesion and rapid peeling. |
| Apply the correct primer for the environment | Seals the surface, improves adhesion, and ensures compatibility with topcoats. | Reduced coating life, poor durability, and inconsistent performance. |
Each step above plays a critical role in coating longevity. When preparation is rushed or incomplete, failures don’t just affect appearance; they impact safety, maintenance schedules, and operational uptime.
In industrial facilities where downtime is expensive, poor wall preparation often costs far more than doing the job right the first time.
The Proper Sequence for Preparing Walls for Painting in Industrial Facilities
Preparing walls for painting in an industrial environment is a deliberate sequence, not a collection of isolated tasks. Each step builds on the one before it, and changing the order (or skipping a step entirely) introduces risk into the coating system. When preparation is handled correctly, coatings bond as designed, perform under stress, and last for years. When it’s rushed, failures show up quickly and expensively.
Below is how professional industrial contractors approach wall preparation, step by step.
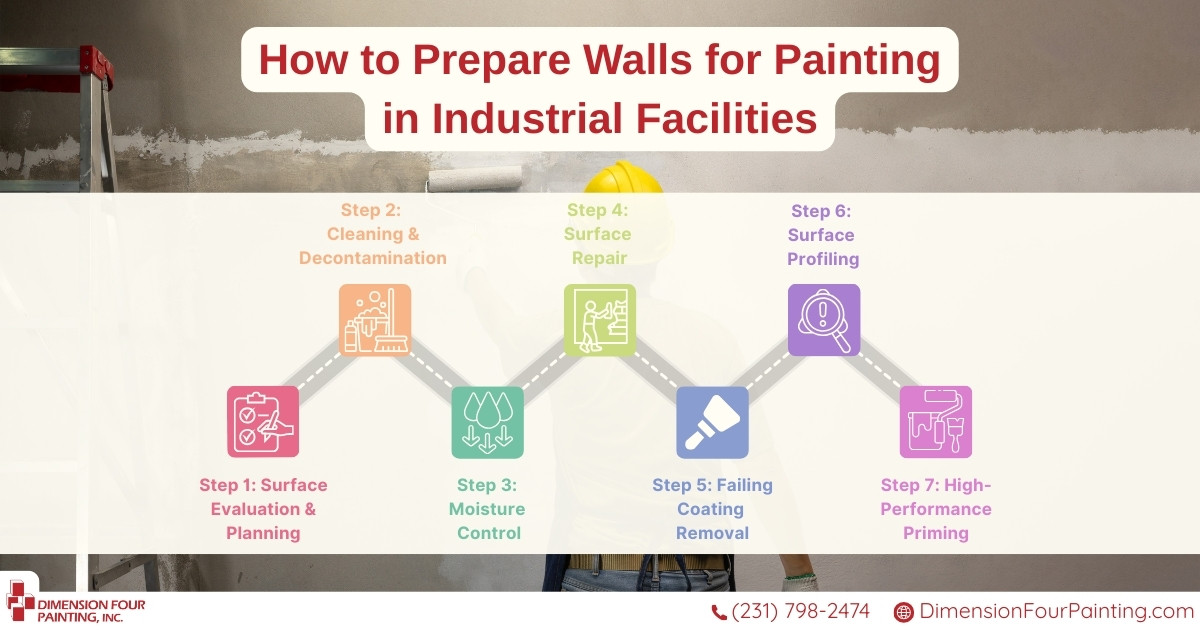
Step 1: Surface Evaluation and Project Planning
Every successful industrial painting project begins with understanding what you’re actually painting. Surface evaluation determines how the wall was previously coated, what it has been exposed to, and what conditions the new coating must withstand.
This includes identifying the existing coating type and condition, checking for moisture intrusion or condensation, noting exposure to oils or chemicals, and assessing surface integrity. For example, a block wall in a manufacturing area may look intact but could be saturated with oil vapor or condensation from nearby equipment. Painting over that without proper prep guarantees failure.
This evaluation phase drives every decision that follows; from cleaning methods to primer selection; and ensures the coating system is matched to the facility’s real operating environment, not just what’s visible on the surface.
Step 2: Cleaning and Decontamination
Industrial walls are rarely clean, even when they appear acceptable at a glance. Airborne dust, oils, grease, chemical residue, and chalking from old coatings create invisible barriers that prevent paint from bonding properly.
Cleaning methods are selected based on contamination type. In oil-heavy environments, degreasing agents may be required. In other areas, pressure washing or targeted chemical cleaning removes embedded residues. Sensitive spaces may require controlled hand-cleaning to avoid overspray or runoff.
This step is critical because paint does not bond through contamination. If residue remains on the surface, coatings adhere to the contaminant, not the wall, and will eventually peel, delaminate, or blister. Proper cleaning is the first true adhesion step in the process.
Step 3: Moisture Control and Drying
Moisture is one of the most common, and destructive, causes of coating failure in industrial facilities. Walls that feel dry to the touch can still hold moisture within masonry, block, or concrete, especially in facilities with temperature swings or high humidity.
Professional preparation accounts for this by identifying condensation-prone areas, allowing sufficient drying time after washing, and using moisture-tolerant primers where conditions demand it. In some cases, moisture testing is necessary to confirm the substrate is ready to receive coatings.
Applying paint over damp surfaces traps moisture beneath the film. Over time, pressure builds and forces the coating to blister, bubble, or peel – often months after the project appears complete. Addressing moisture early prevents failures that are difficult and costly to fix later.
Step 4: Repairing Wall Damage and Surface Defects
Industrial walls take abuse. Forklift impacts, vibration from equipment, thermal expansion, and general wear leave behind cracks, chips, and surface irregularities that compromise both appearance and performance.
Before painting, damaged areas must be repaired so the coating system has a stable foundation. This may involve filling cracks, repairing masonry, leveling uneven areas, or grinding damaged sections back to sound material.
Paint does not hide defects; it highlights them. Worse, unaddressed cracks allow moisture intrusion, accelerating coating breakdown. Proper repairs create a uniform surface that supports even coating thickness and long-term durability.
Step 5: Removing Failing or Incompatible Coatings
Not all existing paint should be painted over. If previous coatings are peeling, flaking, chalking, or poorly bonded, they must be removed. Painting over failing coatings simply transfers the problem to the new finish.
Removal methods vary depending on the situation and may include mechanical grinding, sanding, abrasive blasting, or chemical stripping in specific applications. The goal is not to remove paint unnecessarily, but to eliminate unstable layers that compromise adhesion.
New coatings can only perform as well as the surface beneath them. If that surface is unstable, failure is inevitable; regardless of how advanced the new paint system may be.
Step 6: Creating the Correct Surface Profile
Many industrial substrates, particularly concrete, block, and metal, require surface texture to allow coatings to bond properly. This process, known as profiling, creates microscopic peaks and valleys that give coatings something to grip.
Profiling may be achieved through grinding, abrasive blasting, or mechanical abrasion, depending on the substrate and coating system. For example, a smooth concrete wall may look ready for paint, but without proper profiling, coatings sit on the surface rather than bonding to it.
This step is essential for mechanical adhesion and long-term performance. Without it, even properly cleaned and primed surfaces are at risk of premature failure.
Step 7: Priming for Performance, Not Just Coverage
Primer is not a cosmetic layer, it’s the foundation of the entire coating system. In industrial environments, primers are selected to seal the substrate, improve adhesion, and ensure compatibility between the surface and the topcoat.
Primer selection depends on substrate type, environmental exposure, moisture conditions, and chemical resistance requirements. A masonry wall in a washdown area will require a very different primer than a steel wall exposed to heat or corrosion.
Skipping primer or using the wrong one undermines everything that comes after. Proper priming dramatically increases coating life, durability, and resistance to environmental stress.
Why This Sequence Matters
Each of these steps depends on the one before it. Cleaning without evaluation leads to missed risks. Profiling without moisture control leads to failure. Painting without proper priming shortens coating life dramatically.
In industrial facilities where downtime is expensive, preparing walls for painting correctly is not optional. It is the difference between a coating that lasts and one that fails early – often at the worst possible time.
Why Industrial Wall Preparation Requires Specialized Expertise and Why It Pays Off
Preparing walls for painting in an industrial facility is not a general painting task. Industrial surfaces operate under conditions that residential or light commercial painters rarely encounter – temperature swings, moisture exposure, chemical contact, vibration, and constant mechanical wear. Getting preparation right requires more than effort; it requires experience and judgment.
Specialized industrial contractors bring expertise in areas that directly affect coating performance, including:
- Industrial substrate knowledge – Understanding how concrete, block, steel, and previously coated surfaces behave over time and under stress
- Environmental exposure assessment – Accounting for humidity, condensation, chemical vapors, heat, and airflow that impact adhesion and cure
- Safety and operational awareness – Working around live equipment, production schedules, and facility-specific safety protocols
- Specialized equipment and methods – Using grinding, profiling, containment, and surface testing tools that general painters don’t carry or know how to apply
This experience determines not just how surfaces are prepared, but when certain steps are necessary. Knowing when moisture requires a different primer, when a coating must be fully removed instead of repaired, or when profiling is critical comes from years of industrial work, not guesswork.
When preparation is handled correctly by the right team, the long-term benefits are measurable and significant:
- Coatings last longer, performing as designed instead of failing prematurely
- Maintenance cycles are extended, reducing how often areas need to be repainted
- Corrosion protection improves, preventing small issues from becoming structural problems
- Downtime is minimized, avoiding emergency shutdowns or corrective work
- Safety and cleanliness improve, as coatings remain intact and predictable
- Total cost of ownership decreases, because repainting and repairs happen less often
Proper wall preparation isn’t an added line item; it’s a risk-control strategy. In industrial facilities where uptime, safety, and durability matter, investing in specialized preparation is what turns painting from a recurring problem into a long-term solution.

Final Thoughts: Preparation Is the Difference Between Failure and Longevity
In industrial facilities, paint failure is rarely caused by the coating itself. More often, it’s the result of shortcuts during preparing walls for painting.
When walls are properly cleaned, repaired, profiled, and primed, coatings perform the way they’re designed to; protecting your facility, improving appearance, and reducing maintenance costs over time.
If you’re planning an industrial repaint, don’t settle for surface-level work. Choose a contractor who understands preparation as the foundation of performance.
Ready to protect your facility for the long haul?
📞 Call 231-798-2474 today to discuss your project, or Request Your Free, No-Obligation Industrial Painting Estimate online.
Let’s make sure your walls are prepared right; so your coatings last as long as they should.